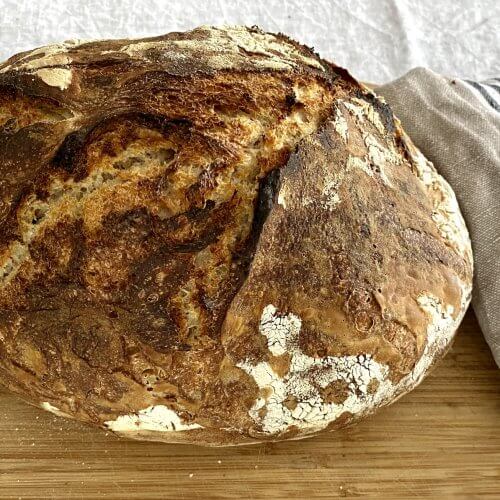
No-knead Dutch oven bread is my favorite recipe for fresh, crusty bread that stays soft inside for days. The secret to keeping it fresh longer is simple: place the bread on your cutting board with the cut side down. This traps moisture and slows down drying, so you can enjoy the bread even after a few days. I love making this bread when serving salads, soups, or even for guests during dinner parties because it’s so versatile and impressive without requiring much effort.
Perfect No-Knead Bread for Every Meal
This bread pairs wonderfully with many dishes. I often bake it to accompany fresh salads or hearty soups. Its crispy crust and soft, airy crumb add a lovely texture contrast that complements both light and rich flavors. When friends visit, I like serving this bread alongside a variety of appetizers or main courses. It always invites conversation and compliments because it tastes like something from a bakery but is surprisingly easy to make at home. Plus, it fills the kitchen with an irresistible aroma while baking, making mealtime feel extra special.
Simple Baking in a Dutch Oven for Impressive Results
What makes this no-knead Dutch oven bread so appealing is the simplicity of the process. You only need to mix a few basic ingredients, let the dough rest at room temperature for 12 to 24 hours, and bake it in a preheated Dutch oven. No kneading, no fancy tools, and minimal hands-on time. The hot Dutch oven creates steam during baking, which helps develop a crunchy, golden crust while keeping the inside soft and tender.
The flavor and texture of this bread rival many artisan loaves from professional bakeries, yet it’s so easy anyone can make it. It’s perfect for busy weekdays or lazy weekends when you want fresh bread without the fuss. I highly recommend trying this recipe, you’ll find yourself baking it again and again.
I usually make this bread using a combination of wheat flour and spelt flour. This mix creates a great balance between structure, flavor, and texture. The wheat flour provides a classic and necessary base, while the spelt flour adds strength and flavor to the dough, helping it rise beautifully. Spelt flour brings a lovely nutty flavor and a slightly different crumb, enriching the overall taste without overwhelming the rustic nature of the bread.
If you’re serving this no-knead Dutch oven bread alongside a warm meal, try my Hearty Minestrone Soup recipe for a flavorful, family-friendly dinner everyone will love.

Dutch Oven Bread – Crispy, Easy, and No-Knead
Ingredients
- 5 dl (2 cups + 1 tbsp) all-purpose flour
- 2 dl (¾ cup + 1 tbsp) whole wheat flour or spelt flour
- 2 tsp salt
- 1 tsp dry yeast
- 3.5 dl (1½ cups) warm water (approx. 42°C / 107°F)
For greasing the pot:
- 2 tsp neutral oil e.g., canola or sunflower oil
For shaping the dough:
- 1 dl (about ⅓ cup) all-purpose flour (for dusting the surface)
Instructions
Mix the dough:
- Warm the water to about 42°C (107°F). In a large bowl, combine the all-purpose flour, whole wheat or spelt flour, salt, and dry yeast. Pour in the warm water and stir just until everything is combined. Do not knead.
- Cover the bowl tightly with plastic wrap and let it rise at room temperature for 12–24 hours. The longer it rests, the deeper the flavor.
Preheat the pot and oven:
- Place a lidded Dutch oven into a cold oven. Preheat the oven (with the pot inside) to 225°C (435°F).
Shape the dough:
- Dust a clean surface with flour. Gently turn the dough out onto the surface and shape it into a loose round ball by folding the edges inward. Be gentle, no kneading needed. Cover with a kitchen towel and let rest for 30 minutes.
Bake the bread:
- Carefully remove the hot Dutch oven from the oven. Grease the bottom and sides lightly with oil. Gently place the dough ball into the hot pot. Cover with the lid and bake for 30 minutes.
- Then remove the lid and bake for another 15 minutes, or until the crust is golden and crisp.
Cool and enjoy:
- Remove the bread from the pot and let it cool on a wire rack. Wait at least 15–20 minutes before slicing for best texture.
Notes
Baking Tips for the Perfect Dutch Oven Bread
1. Don’t skip the long rise.Letting the dough rest for 12–24 hours develops flavor and improves the texture. If you’re short on time, let it rise for at least 10 hours at room temperature. 2. Handle the dough gently.
The dough will be sticky and soft; this is normal! Lightly flour your hands and surface, and gently fold the dough into a round shape. Avoid kneading or over-handling. 3. Always preheat the Dutch oven.
Starting with a hot pot helps create a crispy crust. Preheat the pot inside the oven so it’s piping hot when you add the dough. Be careful when handling! 4. Watch the baking time.
Bake with the lid on for 30 minutes to trap steam, then remove the lid and continue baking for an additional 15 minutes, until golden brown and crisp. The bottom should sound hollow when tapped. 5. Let the bread cool before slicing.
Cooling the loaf on a wire rack allows the interior to finish baking and prevents it from becoming gummy. Wait at least 15–20 minutes before cutting. 6. Add your twist.
For variation, try mixing in chopped herbs, garlic, sun-dried tomatoes, or seeds when preparing the dough.


